


How to Bake a Moist, Tender Olive Oil Cake in Canada
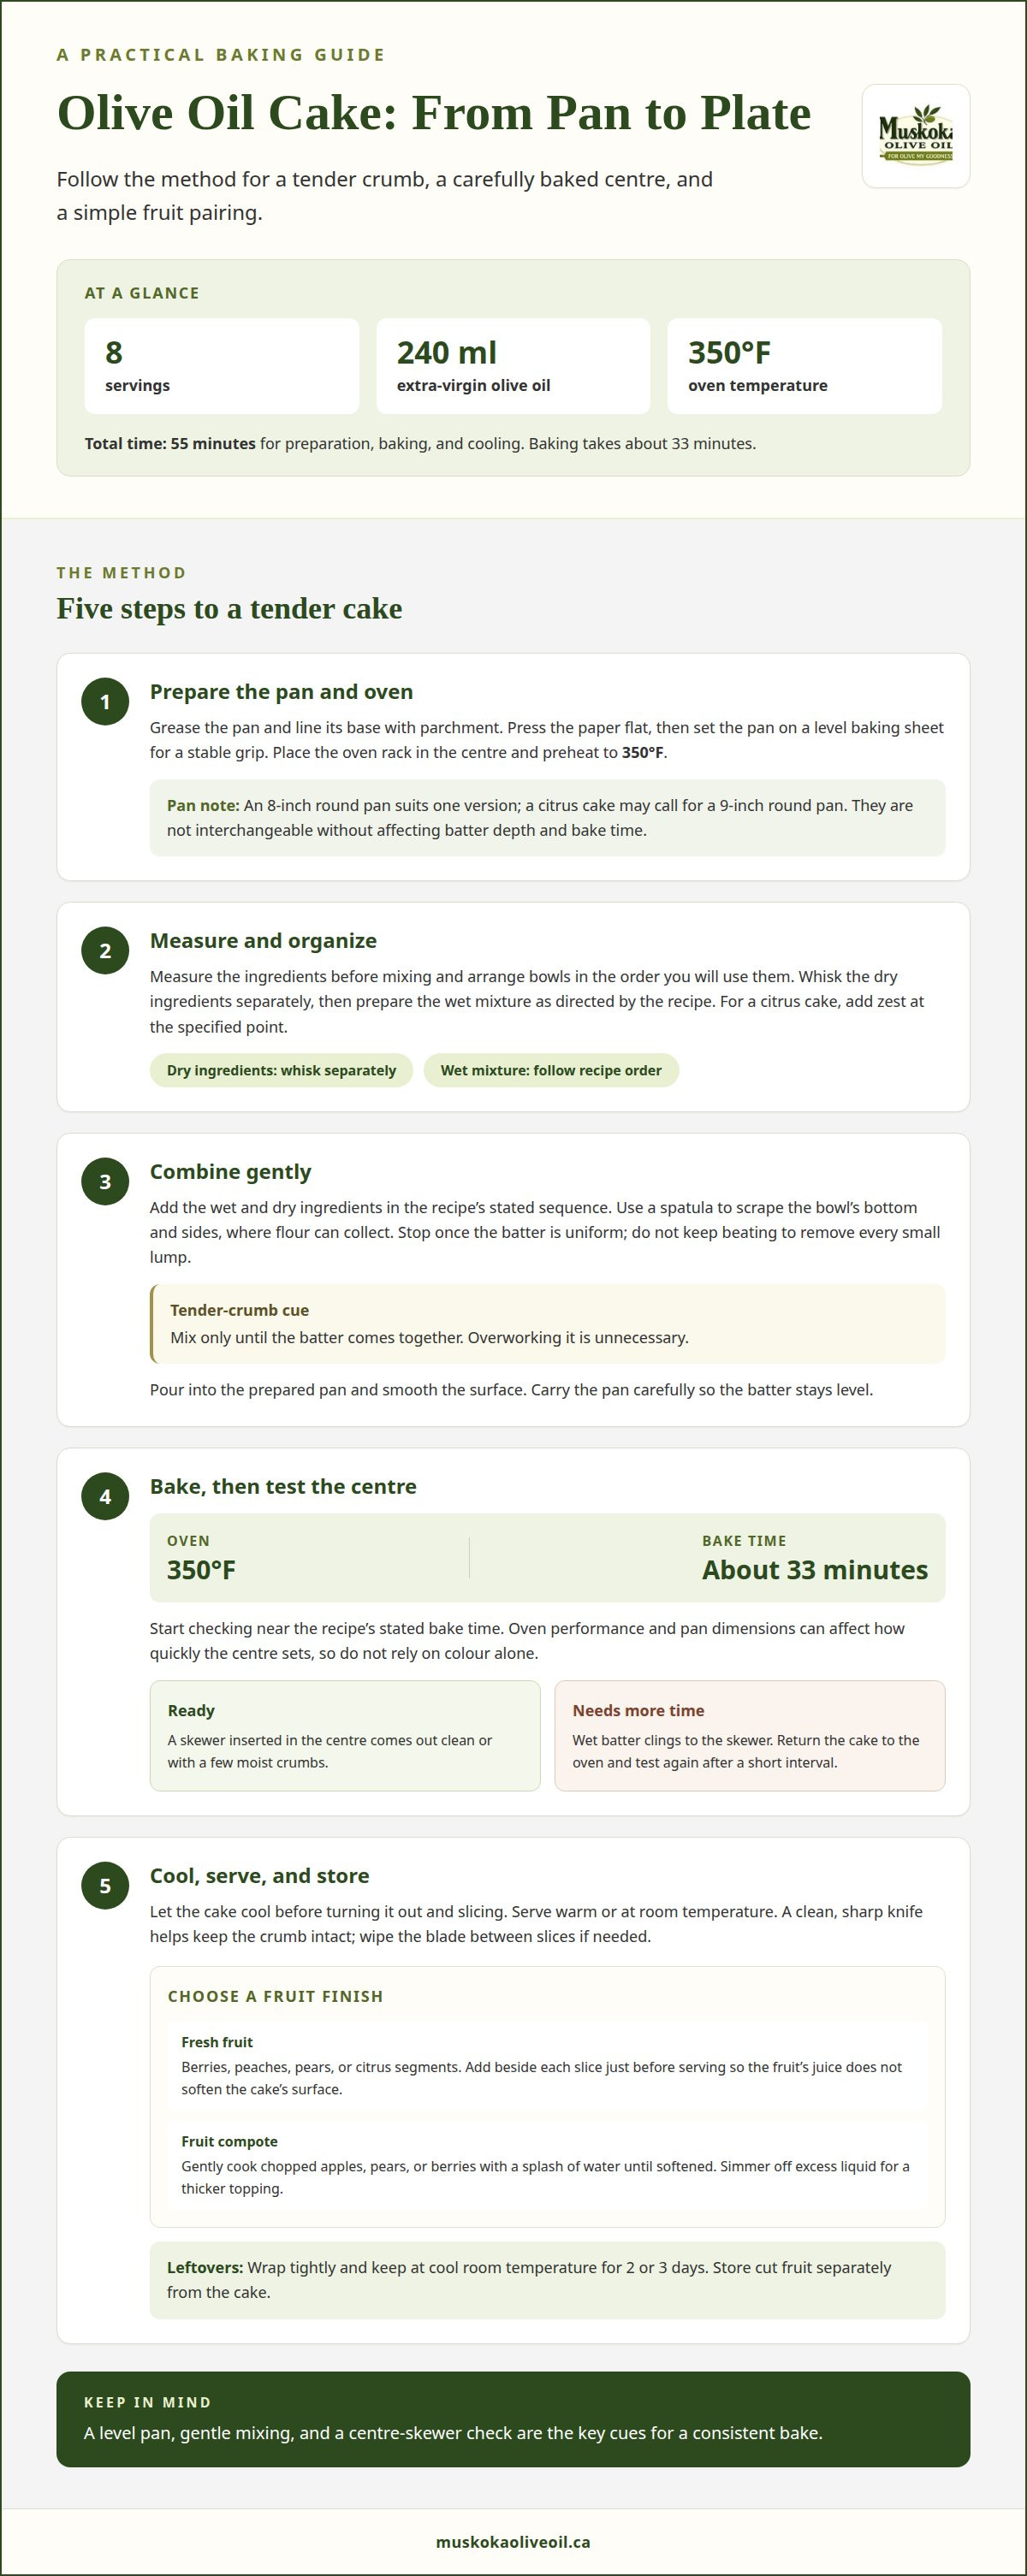
A tender cake doesn’t need butter to feel rich and satisfying. For a practical take on olive oil cake recipes in Canada, use 240 millilitres of extra-virgin olive oil in a batter that makes 8 servings, then bake at 350°F for about 33 minutes. The total time is 55 minutes, including preparation, baking and cooling.
For a soft crumb and delicate olive oil flavour, the method matters as much as the ingredients. This guide covers mixing the batter without overworking it, checking doneness as the cake bakes, and pairing each slice with fresh fruit or compote. You’ll also learn how to cool and store the cake so leftovers stay enjoyable. It’s a welcoming bake for a relaxed weekend, a gathering, or coffee at home.
Key Takeaways
- Prepare the pan and ingredients before mixing, then combine the batter gently to help keep the cake tender.
- Pair slices with fresh fruit or fruit compote, and serve the cake warm or at room temperature.
- Learn how buttermilk and cake flour contribute to the batter’s texture, and how to adapt the method if using other ingredients.
- Let the cake cool before turning it out, then wrap leftovers tightly and keep them at cool room temperature for 2 or 3 days.
- Explore how the olive oil’s flavour can shape the finished cake, from a delicate backdrop to a more noticeable savoury note.
Cake preparation and baking instructions
Set up the pan, oven, and ingredients before mixing. A recipe using 240 millilitres of extra-virgin olive oil makes 8 servings and bakes at 350°F for about 33 minutes.
-
Prepare the cake pan
Choose the pan specified by your recipe, then grease it and line the base with parchment. An 8-inch round pan suits one version; a citrus cake may call for a 9-inch round pan. These sizes aren’t interchangeable without affecting batter depth and bake time.
Press the parchment flat so it doesn’t wrinkle beneath the batter. Set the pan on a level baking sheet before filling it. This gives you a stable surface to grip when moving the pan, especially if the batter comes close to the sides.
Check the oven rack position before preheating. A centre rack leaves room for heat to circulate around the pan, while a tilted rack can lead to uneven browning. Remove any extra racks that could obstruct the cake pan.
-
Mix and bake the cake
Measure every ingredient before you begin, and arrange the bowls in the order you’ll use them. Whisk the dry ingredients separately, then prepare the wet mixture as directed in your recipe. For a citrus cake, add the zest at the point specified so its aroma spreads through the batter.
Combine the wet and dry ingredients in the sequence stated in the recipe. Use a spatula to scrape the bottom and sides of the bowl, where flour can collect. Stop mixing when the batter is uniform; don’t keep beating to remove every small lump.
Pour the batter into the prepared pan and smooth the surface with a spatula. Carry the pan carefully to the oven to keep the batter level. Start timing once the cake is baking, but don’t rely on colour alone to judge whether the centre is done.
-
Set the baking time and temperature
Preheat the oven to 350°F, then bake for about 33 minutes. The complete preparation, baking, and cooling process takes 55 minutes. Oven performance and pan dimensions affect how quickly the centre sets, so begin checking near the recipe’s stated bake time.
Insert a skewer into the centre. It should come out clean or with a few moist crumbs, not wet batter. If batter clings to it, return the cake to the oven and test again after a short interval. Check the centre, since the edges finish baking sooner.
Recipe ratings in Canada vary by site and reader feedback, so compare methods and doneness cues rather than treating any one rating as universal. Lemon, orange, and almond are popular variations. For egg, dairy, or gluten substitutions, choose a recipe developed for that change, since swaps can affect the crumb and rise. Olive oil prices vary by retailer and type, so choose an oil that suits your baking budget and flavour preference. For olive oil cake recipes in Canada, consistent pan preparation and careful doneness checks help you get repeatable results.
Serving with fresh fruit or fruit compote
Let the cake cool before slicing, then choose fruit that complements its citrus and olive oil notes. Serve it warm or at room temperature, with fresh fruit for brightness or compote for a soft, spoonable finish.
- Cool the cake before adding toppings. For warm slices, let it settle after baking, then serve while still gently warm. For room-temperature servings, allow it to cool fully before cutting. A clean, sharp knife helps keep the crumb intact; wipe the blade between slices if fruit or icing sticks to it.
Wait until serving to garnish the whole cake. Fresh fruit releases juice as it sits, which can soften the surface and make slices harder to lift. Instead, arrange strawberries, raspberries, or orange segments beside each slice. This keeps the golden top visible and lets guests choose how much fruit they want.
- Choose fresh fruit to complement the cake’s flavour. Lemon or orange cake pairs naturally with berries, sliced peaches, pears, or citrus segments. Pick ripe fruit with a clean, sweet-tart taste, then cut it into pieces small enough to eat alongside a forkful of cake. For a simple finish, scatter berries over each plate and add a little finely grated citrus zest.
Aim for balance. Very sweet fruit can make the cake taste less nuanced, while tart raspberries or sliced plums add contrast. If serving several fruits, choose a small selection rather than a crowded assortment. Keep cut fruit chilled until plating, then bring it to the table just before serving.
- Make a fruit compote for a warm, soft topping. Put chopped apples, pears, or berries in a saucepan with a splash of water, then cook gently until the fruit softens. Stir occasionally so the pieces cook evenly. Taste before serving: ripe fruit may need no added sweetener, while tart berries may benefit from a little sweetness.
Let the compote cool slightly before spooning it beside a warm slice. A thick compote stays in place better than a watery one, so simmer off any excess liquid. For an aromatic note, add lemon zest to berries or a small pinch of cinnamon to apples. Keep the topping modest so it complements rather than covers the olive oil cake.
- Finish each plate with a restrained garnish. A dusting of icing sugar suits berries, while a few orange segments highlight a citrus loaf or round cake. Add toasted sliced almonds only if they suit the recipe and your guests’ preferences. Place the garnish to the side, then serve with a small spoonful of compote or a few pieces of fruit.
For a cottage lunch or dinner, set out the cake, fresh fruit, and compote separately. Guests can choose a lighter fruit pairing or a richer spoonful of cooked fruit. Store any cut fruit apart from leftover cake; keeping the toppings separate helps preserve the cake’s texture for another serving.
Buttermilk and cake flour in the batter
Buttermilk and cake flour help create a fine, tender crumb. Add them in the right order and mix only until the batter comes together.
- Measure the cultured low-fat buttermilk before mixing. This recipe uses 4 ounces, or kefir as an alternative. Bring it to room temperature so it blends smoothly with the other ingredients. Cold liquid can make the olive oil and eggs feel less cohesive, so set out the measured dairy while preparing the remaining components.
Stir the buttermilk or kefir before measuring if it has separated. Pour it into a small bowl and make sure you have the full amount ready before adding it. This simple setup prevents interruptions while you incorporate the dry ingredients.
- Weigh 5 3/4 ounces of cake flour for the batter. Cake flour’s finer texture helps produce a softer crumb than a denser flour mixture. Spoon it gently into the scale container, then level the amount rather than packing it down. Accurate weighing matters because excess flour can make a tender olive oil cake feel dry.
If weighing isn’t practical, use the recipe’s volume measurement when provided. Don’t assume a cup of cake flour weighs the same as a cup of all-purpose flour. Different flours settle differently, and scooping straight from the bag can compress the measure.
- Sift the cake flour with the other dry ingredients specified in the recipe. Sifting breaks up small lumps and distributes the leavener through the flour. If you don’t have a sieve, use a whisk and stir until the dry mixture looks uniform. This helps prevent pockets of flour or leavener in the baked cake.
Keep the buttermilk separate until the wet and dry ingredients are ready. For a lemon cake, add the zest with the sugar or eggs as the recipe directs. Measuring and preparing each component in advance makes the final mixing stage smoother.
- Add the dry mixture and buttermilk in alternating portions, following the recipe’s sequence. Begin and finish with the dry ingredients if instructed. Mix on low speed or fold by hand, stopping as soon as the flour disappears. Overmixing develops more gluten, which can make the cake chewy rather than delicate.
Scrape the bottom and sides of the bowl once with a flexible spatula. Look for dry flour streaks, then fold gently until they disappear. The batter should be cohesive, not beaten until perfectly smooth; a few small lumps are better than excessive mixing.
- Use kefir when the recipe names it as an alternative to buttermilk, and keep the stated amount unchanged. Both cultured options add moisture and a gentle tang that balances olive oil and citrus. Don’t replace them with plain water, which changes the batter’s richness and acidity.
For dairy-free or gluten-free baking, choose a recipe designed for those ingredients. A direct swap can change moisture, structure, and rise, especially when replacing cake flour. Follow the tested ingredient combination and mixing method rather than adjusting several components at once.
Cake ingredients and yield
For this recipe, choose extra-virgin olive oil for its fresh flavour and use the measured ingredients below. The batter makes one 9-inch cake, cut into 8 servings.
-
Gather the cake ingredients
Set out the ingredients before mixing. For the main batter, measure 240 millilitres of extra-virgin olive oil, 255 grams of all-purpose flour, and 300 grams of granulated sugar. Add 3 large eggs and 295 millilitres of whole milk, both at room temperature.
Prepare 1 tablespoon of freshly grated lemon zest, 2 tablespoons of fresh lemon juice, and 1 teaspoon of kosher salt. Keep each ingredient in a separate bowl or measuring vessel. For a citrus variation, use 1½ cups of almond meal as directed by that version’s recipe; don’t add it automatically to the flour-based batter.
Check the recipe’s ingredient list for its leavener before combining the dry ingredients. The supplied versions differ, so follow one complete recipe instead of borrowing components from several. Measuring accurately and keeping variations separate make the cake easier to reproduce.
-
Select olive oil for baking
Choose extra-virgin olive oil when you want the oil’s character to come through in the cake. This recipe uses it, and a fresh-tasting oil adds its own flavour alongside lemon, sugar, and vanilla. A simple taste test: choose an oil you’d enjoy on a salad.
Light olive oil generally has a milder flavour, making it an option when you want less olive character in the finished cake. It won’t emphasize flavour in the same way as extra-virgin oil. Choose according to the taste you want, rather than assuming one type always produces a better texture.
For your first bake, follow the recipe’s specified oil and measure it carefully. Changing the oil type can change the cake’s flavour, so keep the flour, liquid, and mixing method consistent. That way, you can judge the oil’s effect without changing several ingredients at once.
-
Check the cake yield
Plan for one 9-inch cake and 8 servings. Divide the cake into 8 portions after it has cooled enough to slice neatly. For even servings, cut the cake in half, then divide each half into quarters.
If you’re baking for a smaller table, keep the ingredient quantities intact unless using a recipe designed for a smaller pan. Reducing batter without adjusting the pan can change the cake’s depth and baking behaviour. For a gathering, the 8-serving yield gives you a clear guide when planning fruit, compote, or other accompaniments.
After baking, note the oil you chose and any variation beside the recipe. Recording whether you used a flour-based batter or an almond meal version can help you repeat the result. It also makes future adjustments deliberate, rather than leaving you to guess which ingredient changed the crumb or flavour.
Cooling and storing leftovers
Cool the cake before wrapping it, and store it tightly covered to protect its texture. At cool room temperature, it keeps for 2 or 3 days when wrapped tightly in plastic.
- Leave the baked cake in its pan for about 10 minutes before turning it out. This short rest lets the cake settle and makes it easier to handle. Run a thin knife around the edge, then invert the pan carefully onto a cooling rack. Lift the pan slowly and peel away parchment if it sticks.
Keep the cake level while moving it. A warm cake can be delicate, especially around the edges, so support the base with the rack or a flat plate. Don’t cover it while it’s still warm; trapped steam can dampen the surface and soften the crust.
- Cool the cake completely on a wire rack before storing it. Air circulating beneath the cake lets the base cool instead of trapping warmth against a plate. Check the centre and underside before wrapping; both should feel cool, not warm to the touch.
If you plan to serve the cake the same day, leave it whole until slicing. A whole cake has less exposed crumb than cut pieces. Add fresh fruit or compote only when serving, since juicy toppings can soften the cake during storage.
- Wrap the cooled cake tightly in plastic wrap for storage at cool room temperature. The cake keeps for 2 or 3 days this way. Press the wrap gently against the surface without crushing the top, then cover the sides and base to limit exposure to air.
For a cake that’s already cut, cover the exposed edge carefully. Alternatively, place the slices in an airtight container, arranging them in a single layer when practical. Keep the container away from direct sunlight and warm areas, which can affect the cake’s texture.
- Slice only what you expect to serve, then wrap the remaining cake again. A clean knife creates neater portions and helps keep crumbs off the cut surface. If the cake has powdered sugar or another dry garnish, add it close to serving time.
If a leftover slice feels firm, bring it to room temperature while wrapped before plating. Pair it with fresh berries, orange segments, or a spoonful of fruit compote. Keep the accompaniments separate from the stored cake and add them just before serving.
- Make a brief storage note if you’re baking ahead. Record when the cake was baked and whether it was stored whole or sliced. That detail helps you use the 2-or-3-day room-temperature window sensibly, especially after a gathering or cottage weekend.
To preserve the best texture, protect the cake from air between servings. Rewrap it promptly after cutting, and don’t leave slices exposed on a serving plate. A tightly wrapped olive oil cake stays moist and ready for another cup of tea or coffee.
Muskoka Olive Oil Co.: Infused Olive Oil
Muskoka Olive Oil Co. can help you explore how olive oil flavour shapes a cake’s character. Extra-virgin olive oil brings its own taste to the batter, while infused olive oil offers another way to experiment. For a citrus cake, consider whether an infused oil’s profile will complement the lemon or orange rather than compete with it. Start with the oil specified in the recipe, then try a variation in a future bake so you can compare the results without changing other ingredients.
That same flavour-led approach can guide your choice of oil for everyday cooking, too. Explore the infused olive oil selection for inspiration, then choose an oil that suits the flavours you enjoy baking with.
Visit muskokaoliveoil.ca to explore infused olive oil for your next kitchen experiment.
Make your next bake your own
Turn a successful bake into a recipe you’ll return to by noting what you notice at the table. Record whether guests prefer a more pronounced olive oil flavour, softer sweetness, or a simpler finish. Their comments can help you choose what to explore in a future batch without changing the foundation all at once.
As you explore olive oil cake recipes in Canada, keep a small baking journal alongside your favourite recipes. A few notes about the occasion, the oil you chose, and what you’d try next can make each bake more intentional. Over time, those notes become a useful record of your preferences, not just a set of instructions.
If you’d like a thoughtful starting point for choosing an oil, contact Muskoka Olive Oil Co. and ask about options for baking. Then enjoy making the recipe part of your own kitchen traditions.
Frequently Asked Questions
What ingredients and measurements are needed for a classic olive oil cake?
Use the classic recipe’s measured ingredient list above, and measure each component before combining anything. A kitchen scale gives consistent results for dry ingredients, while a graduated liquid measure makes oil and milk easier to portion. For lemon cake, zest the fruit before juicing it; the peel is easier to handle whole. Keep optional flavour additions separate until you decide they suit the recipe.
How do you make olive oil cake step by step?
Set up the bake so the oven is fully heated and the pan is ready before you start mixing. Arrange ingredients in the order they’ll go into the bowl, and keep a spatula nearby for scraping the sides. Once everything is ready, combine the batter and transfer it to the pan promptly. This workflow helps prevent missed ingredients and unnecessary pauses during mixing.
How can you tell when an olive oil cake is fully baked?
Look for a set, lightly coloured top and edges beginning to pull slightly away from the pan. Check the centre, not just the perimeter, since the outer portion bakes sooner. If the middle still looks glossy or moves like liquid, the cake needs more time in the oven. Combine these visual cues with the skewer test, inserting it into the thickest part.
How should olive oil cake be stored, and how long does it stay fresh?
At cool room temperature, a tightly wrapped cake keeps for 2 or 3 days. For the best eating quality, leave it whole until serving and protect any cut face from air. Fresh fruit and compote should stay separate until plating, since their moisture can soften the crumb. Before serving a stored slice, check its aroma and surface; discard it if either seems unusual.
What substitutions work for eggs, dairy, or gluten in olive oil cake?
Kefir can replace buttermilk in the same stated amount. For egg, dairy, or gluten substitutions, choose a recipe developed for that change, since swaps can affect the cake’s crumb and rise.
Leave a comment