


How to Make Soft, Dimpled Focaccia with Herb Oil
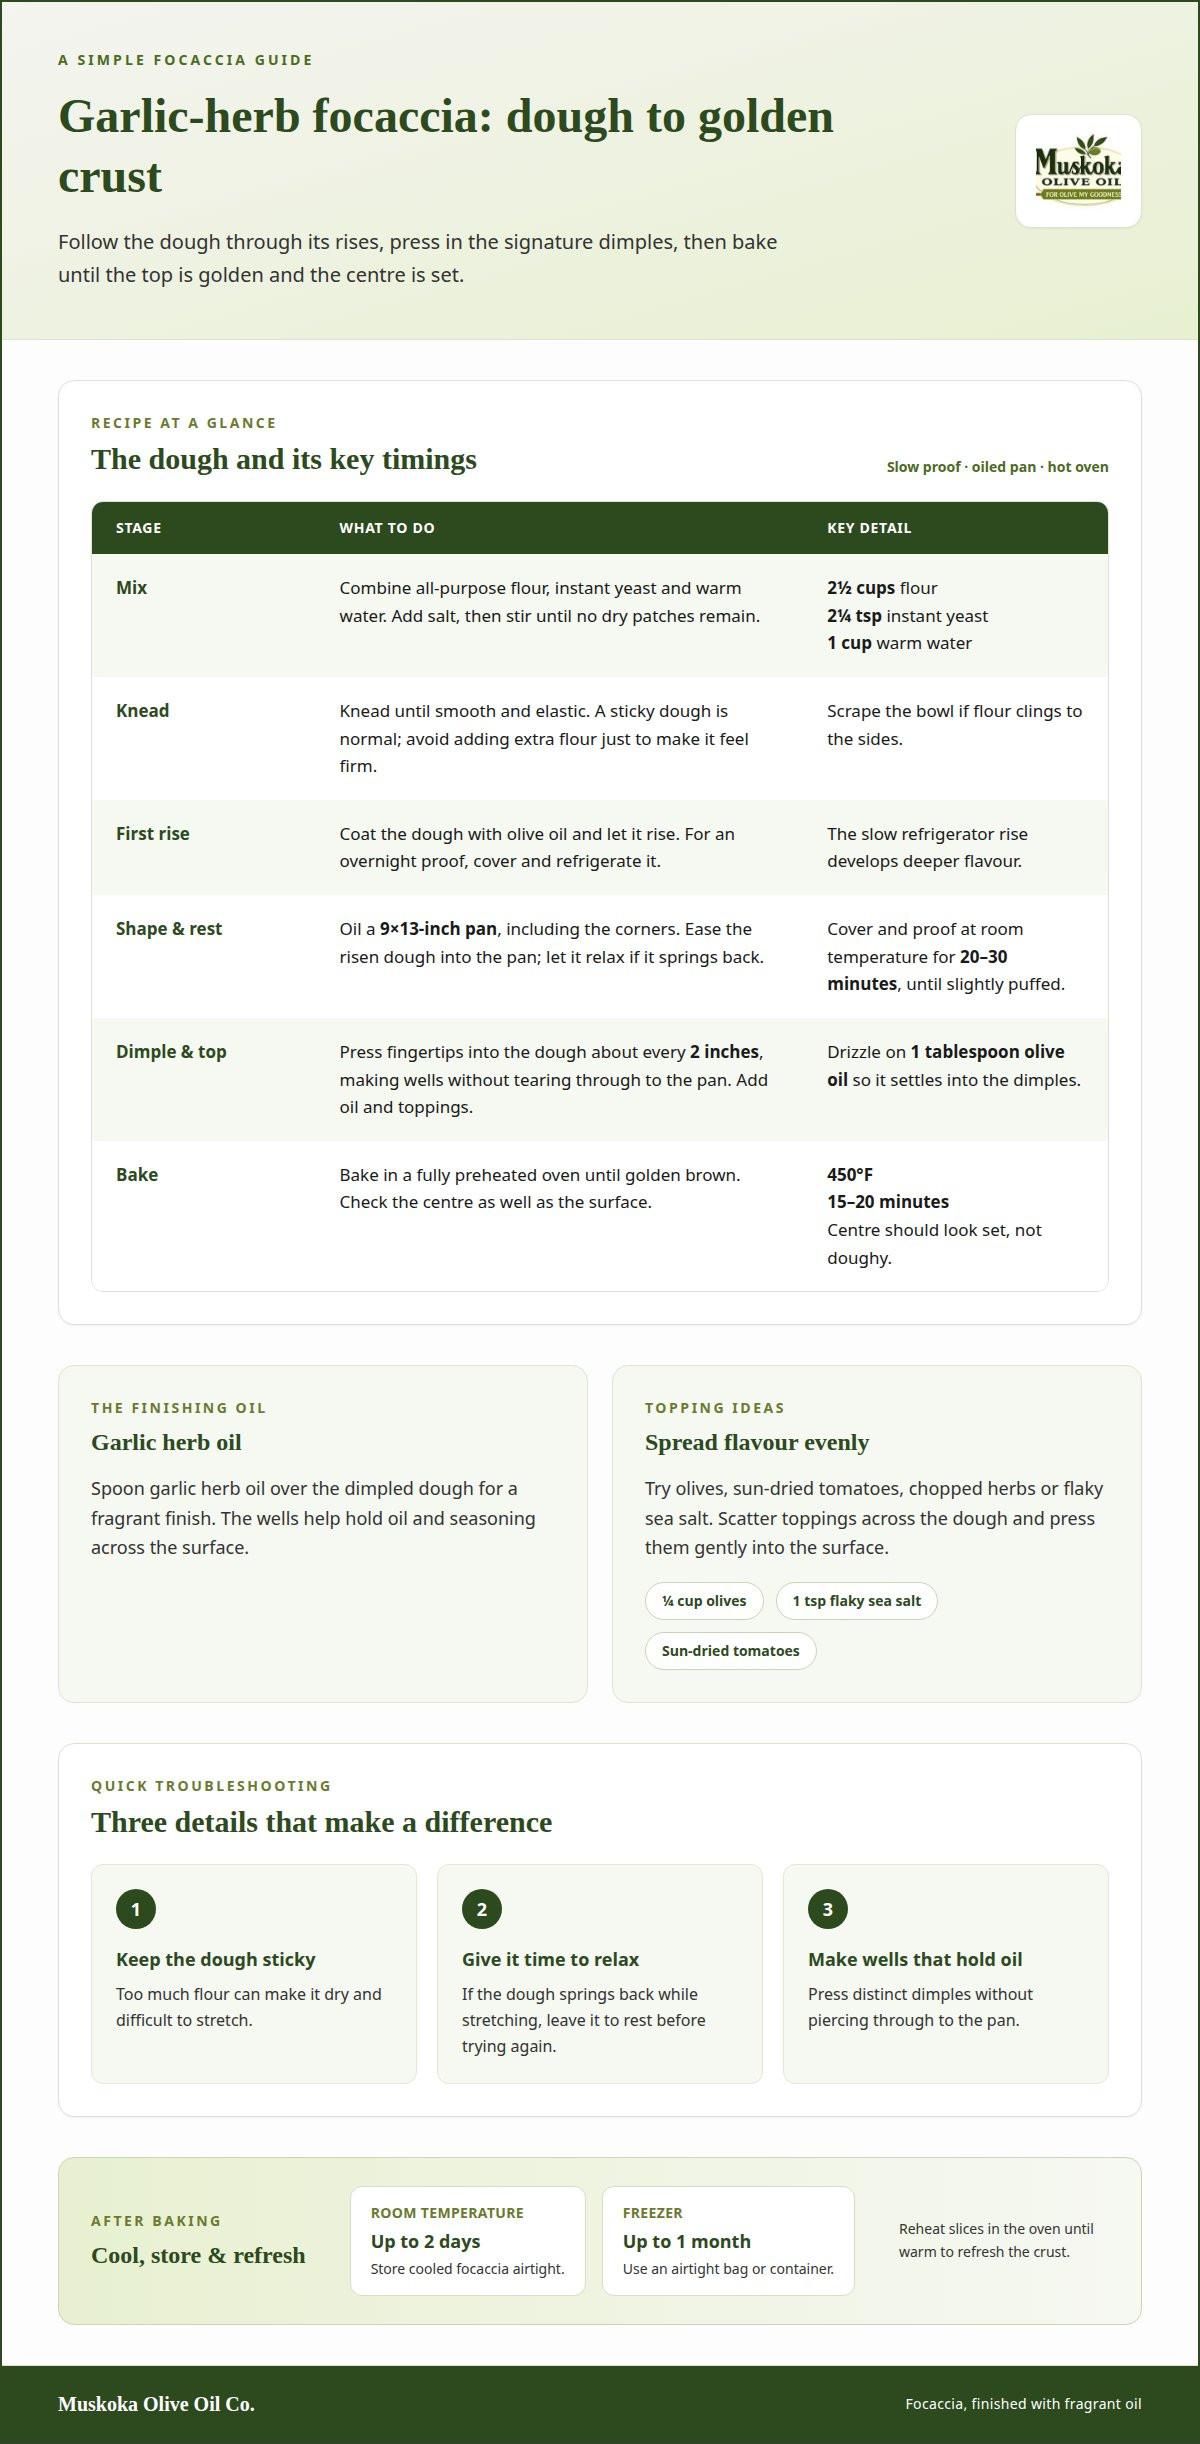
Soft, dimpled focaccia starts with a simple dough and a generous finish of fragrant oil. To learn how to make focaccia with herb oil, mix 2 ½ cups of all-purpose flour with 2 ¼ teaspoons of instant yeast and 1 cup of warm water, then let the dough proof overnight for deeper flavour. Press dimples into the risen dough, spoon garlic herb oil over the surface, add savoury toppings and bake in a 9×13-inch pan at 450°F until golden, about 15 to 20 minutes.
Focaccia is a soft Italian flatbread with a tender interior and a lightly crisp, olive-oil-rich crust. Its dimples hold oil and seasonings, so every bite brings together pillowy bread, fragrant herbs and savoury flavour.
This guide takes you through mixing and proofing the dough, shaping and dimpling it, and preparing a simple garlic herb oil for the finish. You’ll also find practical topping ideas for focaccia that’s inviting straight from the oven and easy to share.
Key Takeaways
- Mix a simple dough with all-purpose flour, instant yeast and warm water, then allow time for a slow refrigerator proof.
- Press fingertips into the risen dough to create the characteristic wells that catch oil and seasoning.
- Build a fragrant finish with garlic herb oil, then add olives, sun-dried tomatoes or flaky salt to suit your taste.
- Bake the focaccia in a 9×13-inch pan at 450°F until golden, then let it cool before slicing.
- Use infused olive oil to bring a convenient layer of herb flavour to your focaccia and other everyday dishes.
Why Dimple the Focaccia Dough?
Dimpling gives focaccia its familiar rippled surface and creates little wells for olive oil and toppings. Pressing your fingertips into the risen dough also spreads those flavours across the bread, instead of leaving them at the edges.
- Measure the dough ingredients. For this recipe, combine 2 ½ cups of all-purpose flour with 2 ¼ teaspoons of instant yeast and 1 cup of warm water. Add salt to season the dough. Measure the flour carefully, since packing it into the cup can make the dough dry and difficult to stretch.
- Mix and knead until cohesive. Stir the flour, yeast and warm water until no dry patches remain. Knead the dough until it feels smooth and elastic, pausing to scrape the bowl if flour clings to the sides. A sticky dough is normal for focaccia; avoid adding extra flour just to make it feel like firm bread dough.
- Oil the dough and pan. Coat the dough with olive oil before its first rise to help keep the surface supple. Then spread olive oil across a 9×13-inch baking pan, including the corners. The oil helps the dough release after baking and contributes to a golden, lightly crisp base.
- Let the dough rise, then stretch it gently. Once the dough has risen, ease it into the oiled pan. If it springs back, leave it to relax before stretching again. For overnight proofing, cover the dough and refrigerate it; the slow rise gives you a flexible dough to shape before baking.
- Dimple with your fingertips. Press your fingers into the dough about every 2 inches, making distinct wells without tearing through to the pan. Work across the whole surface, then drizzle on 1 tablespoon of olive oil so it settles into the dimples. Add chopped herbs or other toppings after shaping.
- Preheat and bake. Preheat the oven to 450°F. Bake the focaccia for 15 to 20 minutes, until golden brown. If the top colours before the centre looks baked, allow it to finish in the oven; the finished bread should feel set rather than doughy.
Store cooled focaccia in an airtight container at room temperature for up to 2 days, or freeze it in an airtight bag or container for up to 1 month. Reheat slices in the oven until warm to refresh the crust.
Common mistakes include adding too much flour, stretching dough before it relaxes, or making shallow dimples that don’t hold oil. Let the dough rest, press deeper without piercing it, and make sure the oven reaches 450°F before baking.
What is Focaccia Bread?
Focaccia is an Italian flatbread with a soft, airy crumb and an olive-oil-rich crust. The dough rises in a pan, where fingertips create dimples for oil and toppings. Baked as directed, the surface turns golden while the centre stays tender.
- Understand the dough’s two rises. The first rise develops the dough before shaping; the second happens after it’s stretched into the baking pan. For this recipe, let the shaped dough rise in the pan for 20 to 30 minutes before baking. It should look slightly puffed, not flat or tightly stretched.
- Proof the pan dough at room temperature. After placing the dough in the oiled pan, cover it and leave it at room temperature for 20 to 30 minutes. This is the second proof, and it gives the dough time to relax and expand. Avoid a cold, draughty spot, which can slow the rise.
- Preheat the oven before the proof ends. Set the oven to 450°F while the dough finishes rising. A fully heated oven helps the dough begin baking promptly and brown evenly. If the oven is still warming, keep the dough covered in its pan until it reaches temperature.
- Finish dimpling and topping before baking. Press your fingers into the risen dough to make wells across the surface, then add the oil and toppings called for in the recipe. Spread olives or chopped herbs evenly, rather than clustering them in one spot. Even coverage helps each portion bake with a balanced mix of bread and toppings.
- Bake until the crust is golden. Bake at 450°F for 15 to 20 minutes, watching for a golden-brown top. The surface should look set, and the edges should pull slightly from the pan. Colour gives a useful visual cue, but also check the centre before removing the pan from the oven.
- Judge doneness by the centre, not colour alone. Fully baked focaccia has a golden surface and a set centre, without wet-looking dough between the dimples. If the top is browning while the middle still seems underdone, continue baking and check again before removing it.
- Plan the preparation around the dough. Mixing and shaping are hands-on stages; proofing happens while the dough rests. Start the oven preheat as the pan rise approaches its end, so the baking temperature is ready when the dough is.
Olive, sun-dried tomato and salt toppings
Choose savoury toppings that complement rather than overwhelm focaccia’s soft crumb. Add them after dimpling so olives, tomatoes, herbs and salt are spread across the surface.
Add Olive, Sun-Dried Tomato and Salt Toppings
- Prepare the olives and tomatoes. Slice or chop ¼ cup of olives, then cut sun-dried tomatoes into small pieces. Smaller pieces sit neatly in the dough’s wells, while larger pieces can make slices harder to cut and serve. If the tomatoes are packed in oil, let excess oil drain first.
- Arrange the toppings evenly. Scatter the olives and tomatoes across the dough instead of piling them together. Press each piece gently into the surface so it stays in place during baking. The olives bring a briny note; sun-dried tomatoes add concentrated, sweet-savoury flavour.
- Finish with flaky sea salt. Sprinkle 1 teaspoon of flaky sea salt over the topped dough. Because olives already taste salty, distribute the salt lightly across the entire pan rather than concentrating it over the olives. The flakes add a crisp, savoury contrast to the tender bread.
For a flavourful variation, combine olives, sun-dried tomatoes and chopped herbs. Keep the pieces small so they settle into the dimples without weighing down the dough.
Add Herbes de Provence and Parmesan
- Season with herbs and olive oil. Sprinkle dried herbs or chopped fresh herbs over the dough, then drizzle with olive oil. Herbes de Provence brings a fragrant blend of Mediterranean-style herb notes. Add the herbs before baking so their aroma meets the warm oil across the crust.
- Add Parmesan in an even layer. Scatter ¼ cup of freshly grated Parmesan over the surface. Fine grating helps the cheese spread evenly, so each portion gets a savoury finish. Avoid forming a thick mound in the centre, where cheese can cover the dimples and toppings.
- Balance the salt with the other ingredients. If you combine Parmesan with olives or flaky sea salt, use a light hand with additional salt. Parmesan and olives both contribute savoury, salty flavour. For a simpler topping, pair Parmesan with herbs and olive oil instead.
Finely chopped garlic adds another savoury layer, but use it sparingly among the toppings. Whether you make the dough with bread flour or all-purpose flour, spread toppings evenly over the surface. This helps the focaccia bake evenly and keeps each flavour distinct.
Overnight refrigerator proofing
Cold fermentation allows focaccia dough to rise slowly in the refrigerator. Plan this resting time before baking, then transfer the dough to a pan and let it finish proofing.
- Choose a proofing window. For an overnight rise, refrigerate the dough for 12 to 24 hours. Some focaccia schedules allow a first rise of at least 12 hours and up to 3 days. Use one timing approach for your recipe, rather than combining different schedules.
- Cover the dough before chilling. Place the mixed dough in a lightly oiled bowl or covered container, leaving room for expansion. Coat the surface with olive oil to limit drying, then cover it securely. A dry skin can resist stretching later and leave rough patches in the finished Italian bread.
- Make room in the refrigerator. Set the covered dough on a level shelf where the container won’t be disturbed. The cold slows yeast activity, so the dough rises gradually instead of following a quick room-temperature schedule. Mark the start time if you’re preparing dough around work or a meal.
- Look for dough that has expanded. After chilling, check for a softer, airier appearance and visible bubbles beneath the surface. The dough may not double in the refrigerator, so judge its texture and expansion rather than expecting a warm-kitchen rise. If it still feels tight, allow it to rest before stretching.
- Transfer and relax the dough. Move the chilled dough into the oiled baking pan and ease it outward without forcing it into the corners. Cold dough can spring back; pause, then stretch again gently. Let it continue proofing in the pan until it looks puffy and can hold fingertip dimples.
- Fit toppings to the slow proof. Add herbs and oil after shaping, not before the long refrigerator rest. For a rosemary finish, chop the leaves finely and sprinkle them over the dimpled dough with olive oil. A tablespoon of oil helps carry the aroma across the surface without burying the bread.
- Build baking into your kitchen schedule. If serving focaccia with soup or making sandwiches, start the dough the day before. The refrigerator handles most of the inactive time, leaving shaping, the final proof and baking for the day you plan to serve it. Keep toppings ready while the dough relaxes in its pan.
For a more pronounced herb aroma, save some chopped rosemary to sprinkle on after baking. It adds a bright fragrance alongside the warm, olive-oil-rich crumb.
Garlic and herb-infused olive oil
Garlic herb oil gives focaccia an aromatic finish and carries seasoning into its dimples. Warm the oil gently, then drizzle it over the shaped dough before baking.
- Measure the oil and dried herbs. Combine 2 cups of olive oil with 2 tablespoons of dried basil, 2 tablespoons of dried parsley, 1 tablespoon of dried oregano, 1 tablespoon of rosemary needles and 1 teaspoon of dried thyme. Add 2 tablespoons of granulated garlic and 1 tablespoon of kosher salt or coarse sea salt. These amounts make a generously seasoned oil.
- Warm the mixture over low heat. Place the oil and seasonings in a small saucepan. Heat gently for 5 to 10 minutes, stirring occasionally, until aromatic. Keep the heat low; the aim is to release the herbs’ fragrance, not fry or brown the garlic.
- Use fresh garlic with care. For a fresh-garlic variation, use 10 cloves, pressed and lightly sautéed in ½ cup of olive oil. Watch the pan closely as garlic can brown quickly and taste bitter. Keep the amount modest if you want the bread’s olive-oil flavour to remain balanced.
- Let the oil settle before applying it. Take the saucepan off the heat and allow the mixture to cool enough for handling. Stir it again so the herbs and garlic are distributed. A spoonful of settled seasoning gives a stronger herb flavour than clear oil alone.
- Drizzle oil into the dough’s dimples. After shaping, use a spoon to guide the garlic herb oil across the surface. Let some collect in the wells, but avoid flooding one area. The dough should still show its dimples and toppings beneath the coating.
- Adjust the salt to match your toppings. If the focaccia already has olives, Parmesan or flaky sea salt, reduce the extra salty seasoning in the oil. For a simpler loaf, the full herb mixture adds flavour across the crust. Taste the oil before pouring it over the dough.
- Choose when to add a finishing drizzle. Use most of the seasoned oil before baking, then reserve a little for a light finish after the focaccia comes out. The pre-bake oil settles into the dimples; a small post-bake drizzle highlights the herbs’ aroma.
- Keep the dough’s temperature separate from the oil. Use warm water for mixing the dough, not for heating the herb oil. Add the oil after mixing and shaping, rather than pouring hot oil onto dough at room temperature. This keeps the topping stage controlled and lets the dough rise as intended.
For a simpler finish, brush the dough with plain olive oil and sprinkle chopped herbs over the surface. Dried herbs give concentrated, even flavour, while fresh rosemary adds a brighter note. Let the garlic herb oil complement the focaccia rather than mask its soft crumb.
Muskoka Olive Oil: Infused Olive Oil
Muskoka Olive Oil Co. offers infused olive oil for adding aromatic flavour to focaccia and everyday cooking. For a simple herb-forward finish, explore infused olive oils as an alternative to mixing garlic and dried herbs into plain oil. Drizzle your chosen oil over the dimples before baking, or add a little after baking to highlight its aroma.
Extra virgin olive oil is another option when you want the bread’s toppings to lead. Pair focaccia with white or dark balsamic vinegar for dipping, or serve it alongside a meal. The best choice depends on whether you want the oil to complement herbs, bring its own distinct flavour, or keep the finish classic.
Explore infused olive oils at Muskoka Olive Oil Co. online to find a flavour for your next focaccia.
Bring Your Own Flavour to the Next Bake
Let your next baking day build your confidence with yeast dough. Once you’ve learned how to make focaccia with herb oil, you can apply the same care and patience to other homemade breads. Notice how the dough feels as you handle it and jot down what you might adjust next time. Small observations can make each bake more rewarding.
Sharing the process can be part of the pleasure, too. Invite friends or family into the kitchen, set the table together and enjoy a meal that reflects your cooking style. Each bake doesn’t have to be identical; curiosity is a fine place to start.
For thoughtful guidance as you explore olive oil for home cooking, visit Muskoka Olive Oil Co. online. Enjoy making the next bake your own.
Frequently Asked Questions
Can I Use Dried Herbs Instead of Fresh?
Yes. Dried herbs are convenient when fresh ones aren’t available, and they blend easily into oil. Lightly crush rosemary or oregano between your fingers to release more aroma. Mix the herbs in a small bowl, then taste the oil before adding it to the dough. You can adjust the blend without over-seasoning one part of the loaf.
What ingredients and quantities are needed for herb oil focaccia?
Use the recipe’s stated ingredient quantities rather than estimating by eye. To vary the flavour, keep the dough formula unchanged and switch one topping, such as Parmesan for olives. For a larger batch, scale every dough ingredient consistently and divide the dough between pans. If the dough amount doesn’t suit the pan space, it may bake unevenly.
How do you make focaccia dough step by step?
Follow the recipe’s mixing and rising sequence, using a flexible bowl scraper to gather sticky dough without adding extra flour. Scrape down the sides of the bowl as needed to keep the mixture together before it rises. If handling the dough by hand, lightly oil your hands first. This makes it easier to move while preserving its soft texture.
Which herbs work best in focaccia herb oil?
Choose herbs that suit the other flavours on the bread. A restrained blend lets olives or sun-dried tomatoes stand out; a more aromatic mix works well on plain focaccia served with dinner. Remove tough, woody stems before chopping fresh herbs, then distribute the leaves through the oil to avoid concentrated patches or mouthfuls of stem.
How do you make herb-infused oil safely for focaccia?
For a cautious, simple method, use dried herbs and prepare only as much oil as you need for the focaccia. Keep fresh garlic and other moist ingredients out of any mixture you plan to store. Use clean utensils, and don’t treat homemade garlic oil as shelf-stable. A commercially prepared infused oil is another convenient way to season the dough.
What oven temperature and baking time produce golden focaccia?
Use the recipe’s oven setting and baking interval as a guide, while accounting for your oven and pan. An oven thermometer can help identify a temperature reading that differs from the setting. A dark pan may brown the base differently from a lighter one, so check both the underside and top before removing the focaccia.
Should focaccia dough be kneaded or folded?
Both methods help develop dough, and folding is useful when a soft mixture is awkward to knead. With damp or lightly oiled hands, lift one edge and fold it towards the centre. Turn the bowl and repeat. Handle the dough gently, stopping once it feels more cohesive. This can help you avoid working in extra flour.
Can you make focaccia dough ahead or refrigerate it overnight?
Yes. For easier planning, refrigerate the dough in a covered, clear-sided container so you can see how much it expands without repeatedly opening it. Leave room for the dough to grow and label the container with the mixing time. Prepare toppings separately and add them after shaping so herbs and other ingredients don’t become soggy during the rest.
Leave a comment